It comes as no surprise that chalk paint has universally become the favourite  medium for painting furniture. It presents a number of clear advantages over any other type of paint, both in aesthetic and in practical terms.
Amongst its main selling points are the facts that it is very easy to apply, it adheres to virtually any surface, it leaves a lovely matt finish, and it it ideal for distressing and many other interesting and sought-after painting effects.
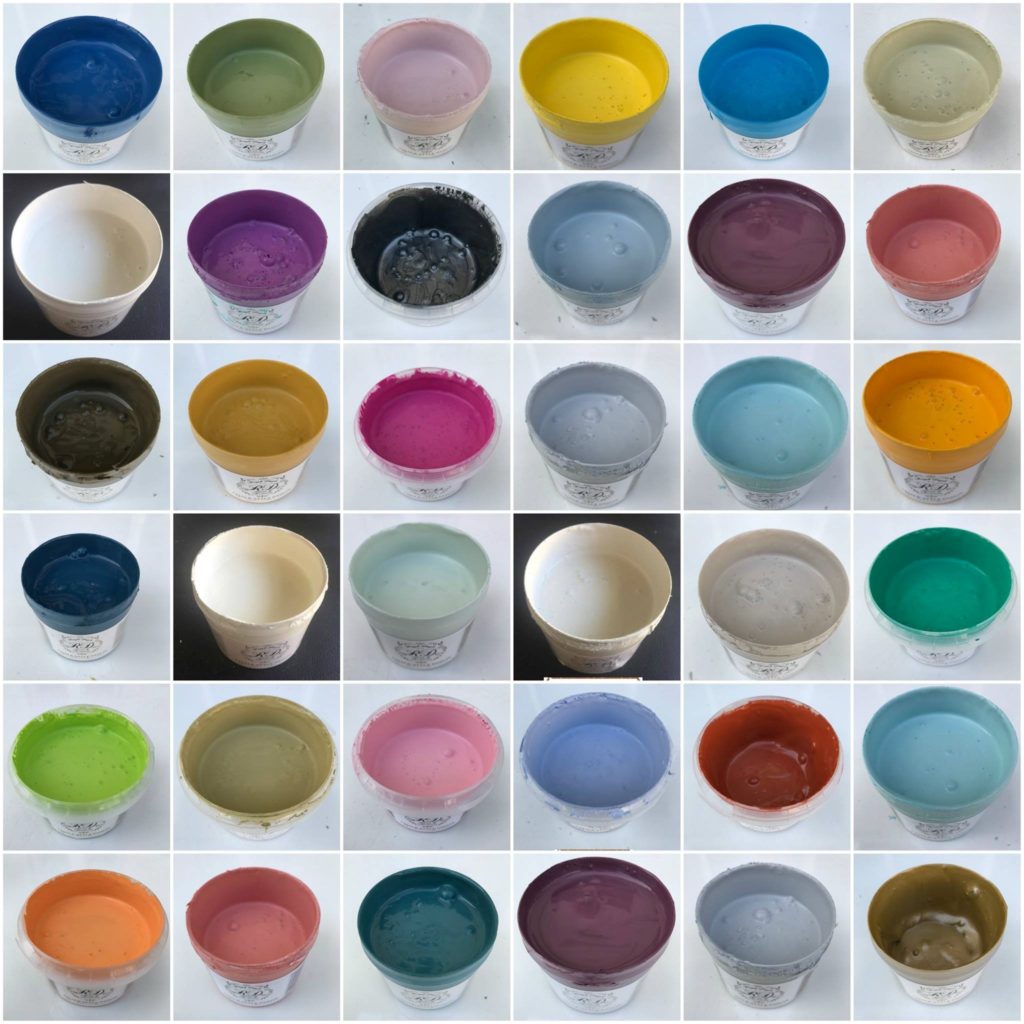
Razzle Dazzle chalk paints are ready-mixed, and require no preparation whatsoever. They are odourless and toxin free, and they offer great coverage, making them go a long long way.
Read on, to find out more…
STRIPPING & SANDING OF SURFACES BEFORE PAINTING
Stripping of the surfaces you are about to paint is rarely necessary. Chalk paint adheres to most surfaces including smooth veneers, polished and varnished surfaces and glossy painted furniture.
Stripping is usually recommended for painted surfaces which are flaky, uneven and in a poor general state, making it very hard for the fresh coats of paint to conceal.
You may, at will, decide to give a very quick and light sanding over certain surfaces, to reduce blemishes and to increase adherence of the paint, however even this is not necessary in most cases.
 PAINTING
Usually no undercoat or primer is necessary, and the chalk paint may be applied directly onto the wooden surface.
You may, on the other hand, choose to apply an undercoat to seal off the wood from the chalk paint, to reduce the risk of the chalk paint being stained. Sometimes with certain woods and veneers, pigments from the previous stains and varnishes, as well as from the wood itself, can react to the chalk paint and are released into the paint, resulting in visible stains and blemishes. This is more frequent when painting with white and other light colours, for obvious reasons.
Applying a primer may also avoid excessive coats of chalk paint and reduce the number of coats necessary.
This process however, rarely guarantees that staining will be totally eliminated and may also complicate the later distressing process. Most chalk paint enthusiasts and purists therefore, prefer to start off immediately with chalk paint and work their way through any ensuing incidences, if and when these might arise.
Use Razzle Dazzle paints as presented, right out of the pot. Do not add any water or other additives. Use a normal brush which has never been dipped in thinner or other solvents. Shabby Chic recommends the internationally acclaimed Cling On brushes, for a perfect finish. Not only do they last infinitely more than cheap brushes, but they do not lose their bristles while painting and greatly reduce visible heavy brushstrokes. You will be surprised at the difference and the general ease of painting.
Apply the first coat very sparingly. Especially when painting a light colour on a dark wood, the first coat will result in very sparse coverage. However this will create a good grip for subsequent coats.
Continue applying consecutive coats, until you are visually happy with the result. In most cases, unless you are after certain special effects, your aim will be to finish off with a totally closed paint job, entirely concealing the wood beneath, even if you intend to distress afterwards.
Chalk paint dries very quickly, so you may apply each successive coat easily within an hour of the preceding one.
There is absolutely no need to sand down each coat in the process. On the contrary, chalk paint leaves quite a gritty coat, so sanding it would actually result in a smoother surface rather than a rougher one for added adherence of subsequent coats.
 DISTRESSING
When you are happy with the final result, irrespective of the number of coats applied, you may choose to start distressing. This is done by sanding down the areas and parts of the furniture where you wish to obtain such a visual effect.
Distressing is definitely not a must, and you might wish to retain certain pieces entirely painted over, with no distressing whatsoever, depending on the final effect you are after.
Distressing is a very subjective and personal thing, although in principle there are also certain guidelines, depending on the the type of furniture, its setting within its immediate environment, as well as the paint and underlying colour/s, there are no hard and fast rules.
Usually, the more distressed an item is, the shabbier and more rustic it will seem. Keep in mind that by distressing you will reveal the colour of the wood beneath, and/or any previous paints applied to the same surface in the past.
While distressing is very simply achieved by sanding with a rough paper of around 150 point, there are many varying methods to this technique.
Shabby Chic recommends you use foam backed sandpaper, which is much kinder to your hands and is also more effective to use in corners, as it doesn’t fold up and crinkle so easily.
The most typical process is to rub away much of the paint on the edges of the furniture. This creates a softer, used look, considerably lessening the starkness of the paint and literally taking the edge off your freshly painted furniture.
It is also a good idea to distress any contours and outlines of moulds and carvings on your furniture, as this will tend to highlight them and bring them back to life, through the beautiful contrasts created.
If you want a heavily distressed and shabby look, then you can continue distressing over much of the furniture, including flat surfaces, to eliminate all solids. This results in a rough look and exposes much of the previous surface.
There are many intriguing ways of revealing wood features and previous colours and surfaces, rendering your piece into an attractive work of art.
OBTAINING A SMOOTH FINISH
Due to its consistency, chalk paint leaves a slightly gritty surface when it dries. Although in certain cases this may be acceptable, in most instances you might want to smoothen it. For this purpose give a very light sanding with 300 or 400 point sandpaper. A few quick strokes usually suffice to acquire a lovely smooth silky surface, so beware not to overdo it, as this would result in further distressing of your surfaces.
Shabby Chic recommends you use foam backed sandpaper, which is much kinder to your hands and is also more effective to use in corners, as it doesn’t fold up and crinkle so easily.
SEALING THE PAINT – WAX OR VARNISH
As chalk paint is very porous, it tends to dust off if rubbed, and is prone to being stained, it must always be sealed after being applied.
You must therefore always seal it with wax or varnish.
Although personal preference is always part of the equation, we suggest that varnish is used on regularly used surfaces, and wax on objects with generally less wear and tear. Varnish tends to be more protective and durable than wax, so it might be a better option for tabletops, desks, work surfaces, chairs and other surfaces in regular use.
Shabby Chic strongly recommends Razzle Dazzle matt, water-based varnish, which is purposely formulated to protect chalk paint in the most unobtrusive and subtle of ways. Barely visible at all, its matt finish protects, virtually without being seen and taking nothing away from the matt chalky effect of the paint.
You may wish to apply more than one coat of varnish for added protection, each time letting it dry properly and giving a very light sanding to each coat before applying the next.
For surfaces which will be in frequent and direct contact with water, such as in kitchens and bathrooms, and for added scratch and anti-stain protection, Shabby Chic has also developed its own heavy-duty and resistant Kitchen and Bathroom Varnish.
Waxing is also an effective way of protecting your painted surfaces and has the added advantage of leaving a very elegant silky look. It repels water and most other liquids, it nourishes the wood and it gives a great sleek and velvety finish to the touch and to the eye.
Most waxes are applied with a clean dry cloth, whereby it is first smeared relatively thickly onto the surface, then slowly but thoroughly rubbed in with another clean cloth. Give the wax time to be absorbed by the wood, then apply various successive coats in the same manner.
Shabby Chic provides local 100% pure beeswax, which is purposely made for us. It tends to be fairly thin and relatively liquid, ideal for items that require a lot of nourishment and making it much easier to apply, even with a brush. Due to its light consistency it goes a very very long way, and even a small quantity will last you a very long time.